Configuring Controllers
This page explains how to configure controllers in Dolphin, assuming the controller is connected and working with your system. If you need help, or want game-specific configurations, see the forums.
GameCube controller
Before setting up a GameCube pad, go to the Dolphin config and click the "Gamecube" tab.
File:Dolphin-Gamecube-config-window.png
Here, you can set what is plugged into the various GameCube emulated ports. If you wish to use more than one GCpad, make sure you set the correct number in this window.
After you select what do you want to use, go to "GCpad" window to configure your controllers.
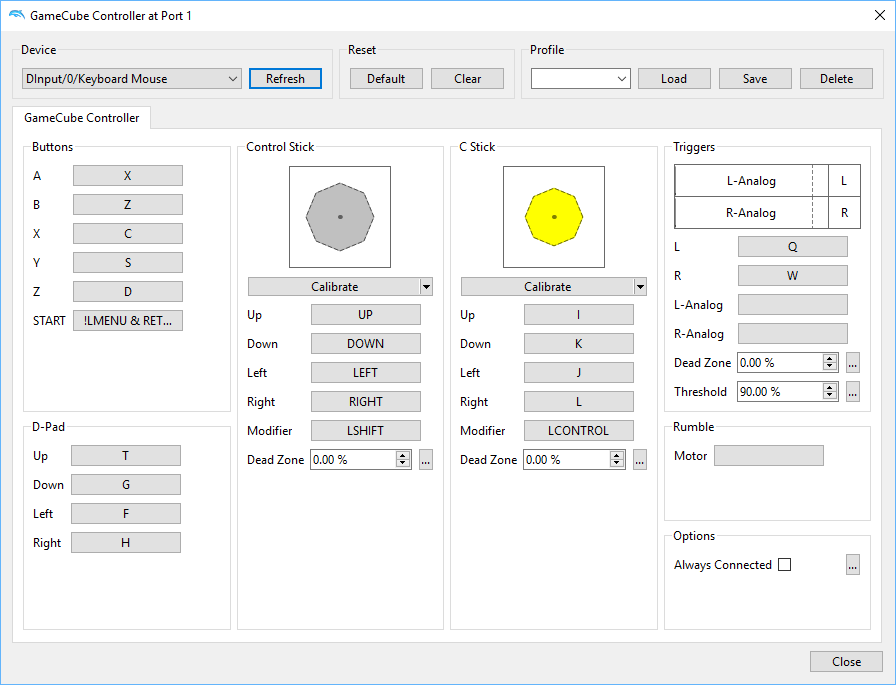
Choose any device that is connected to your PC in the Device dropdown, and set the buttons and axes to your liking.
- Left click a slot to detect input, then press a button or axes on your selected controller to save it to that slot.
- Middle click a slot to clear it of inputs.
- Right click a slot to show more input options.
Please note that on Windows machines, after selecting a device in the Device dropdown it will appear blank. Press refresh and the device you picked will display correctly.
If you controller supports it, "Rumble" will allow your controller to experience the GameCube's rumble functionality. Once in the window, click on the motor pattern you wish to use (sine, cosine, etc), and press "Select" to apply it. If you wish to add a second pattern, with your existing pattern still there, click another pattern and press "|OR". Hit OK to accept the changes and exit the window.
Background input lets you use the controller even if Dolphin isn't in focus.
"Profile" allows you to save/load input configs.
After setting up everything that you want, click "OK" and the changes will save.
Configuring an original GameCube controller using the Mayflash “GC Controller Adapter for PC USB”
This is how you want to configure it to use the original controller just like you would on a GameCube:
File:Dolphin GCPad config window for original GCC.png
For the analog sticks, a Radius of 100 gives you full input range control (except for the physical parts of the controller that restrict the potentiometer range). A lower value will give you that much percent of the input range. With a perfect controller, 100% would be 0-255 for every axis, so for 50%, that would decrease to 64-191. Depending on how the game uses these values, this will, for example in Super Smash Bros. Melee, result in easier walking instead of dashing, but might prevent you from performing certain actions that require near maximum inputs.
Wii Remote
File:Dolphin-wiimote-config.png
Dolphin can use both real and emulated Wiimotes.
Real Wiimote
Select Real Remote in the dropdown for a Wiimote slot. Dolphin supports up to 4 Real Wiimotes at once, along with any peripherals you have attached to them.
- To connect a Real Wiimote, press Refresh then press the "1" and "2" buttons on your Wiimote simultaneously. If Continuous Scanning is enabled, there is no need to press refresh every time: just press the "1" and "2" buttons simultaneously after the game is running or when the Wiimote window is open. Real Wiimote connectivity will only work if one of the Wiimotes is set to "Real Wiimote" or "Hybrid Wiimote". RVL-CNT-01-TR Wii Remote Pluses do not work with this method, see the Wii Remote Plus (RVL-CNT-01-TR) Connection Guide.
If Enable Speaker Data is enabled, the wiimote speaker can produce sound. If disabled, it cannot. Some games, like Metroid Prime 3, have lag issues when Enable Speaker Data is enabled.
Continuous Scanning allows you to connect a Wiimote without having to open the Wiimote window and press refresh every time. As long as a game is running or the Wiimote configuration window is up, just press "1" and "2" on your wiimote simultaneously and it will connect.
Sensor Bar Position, IR Sensitivity, Speaker Volume, and Wiimote Motor are duplicates of Wii settings. They do exactly what they say they do, and work exactly like the same settings on the Wii itself.
Reconnect Wiimote on State Loading automatically reconnects the Wiimote after a savestate is loaded.
If a game thinks a wiimote has been disconnected during play, pressing "Alt-F5" may correct it.
Dolphin does not automatically turn off Wii Remotes as the Wii will, remember to turn off controllers on your own to save battery power.
The power button on Wiimote will not affect Dolphin, nor vice versa.
Emulated Wiimote

Emulated remote works in the same way as the GCpad settings. Choose any device that is connected to your PC in the Device dropdown, and set the buttons and axes to your liking.
- Left click a slot to detect input, then press a button or axes on your selected controller to save it to that slot.
- Middle click a slot to clear it of inputs.
- Right click a slot to show more input options.
Please note that on Windows machines, after selecting a device in the Device dropdown it will appear blank. Press refresh and the device you picked will display correctly.
Extension Allows you to add an emulated nunchuk, guitar, or other wiimote peripheral. Select the extension you want to emulate in the dropdown, and press configure to open a window with slots just like the emulated wiimote window. Select buttons and axes as you wish, and press OK to save.
Background input lets you use the controller even if Dolphin isn't in focus.
Sideways Wiimote changes the emulated wiimote controls to allow you to play games as though the wiimote is sideways, without actually changing your controls. It is useful for games such as New Super Mario Bros. Wii that are designed for it.
Upright Wiimote alters the base swinging and tilting orientation of the emulated wiimote to the upright position.
If you controller supports it, "Rumble" will allow your controller to experience the Wiimote's rumble functionality. Once in the window, click on the motor pattern you wish to use (sine, cosine, etc), and press "Select" to apply it. If you wish to add a second pattern, with your existing pattern still there, click another pattern and press "|OR". Hit OK to accept the changes and exit the window.
"Profile" allows you to save/load input configs.
After setting up everything that you want, click "OK" and the changes will save.