|
|
Progress Continues
We've already had 21502 updates since Dolphin 5.0. Keep up with Dolphin's continuing progress through the Dolphin Blog: February, March, and April 2024 Dolphin Progress Report. |
|
|
The Dolphin Emulator Wiki needs your help! Dolphin can play thousands of games, and changes are happening all the time. Help us keep up! Join in and help us make this the best resource for Dolphin. |
Configuring Controllers: Difference between revisions
(Removing the mayflash instructions, and added a note about radius. Now that Dolphin has official support for the GameCube controller, the unofficial mayflash adapter no longer needs details here. (it was always a bit questionable anyway)) |
(Full on update. Should be fine for 5.0.) |
||
| Line 1: | Line 1: | ||
This page explains how to configure controllers in Dolphin, assuming the controller is connected and working with your system. If you need help, or want game-specific configurations, see the [http://forums.dolphin-emu.org/ forums]. | This page explains how to configure controllers in Dolphin, assuming the controller is connected and working with your system. If you need help, or want game-specific configurations, see the [http://forums.dolphin-emu.org/ forums]. | ||
== GameCube controller == | == GameCube controller == | ||
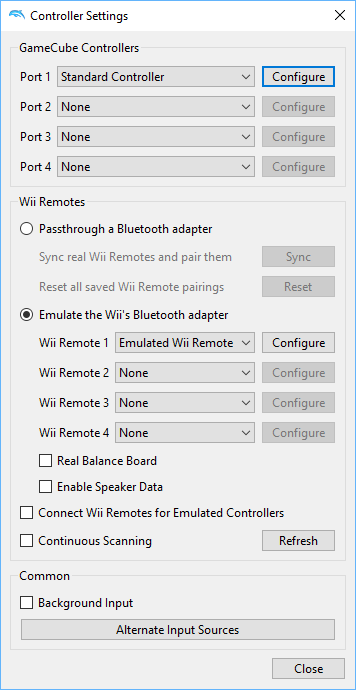
First, click the '''"Controllers"''' button. | |||
[[File:Dolphin- | [[File:Dolphin-Controller-Config.png|link=]]<div style="clear: left;"></div> | ||
In this screen, you can set what is plugged into the various emulated ports. If you wish to use more than one GCpad, make sure you set the correct number in the top under "GameCube Controllers". | |||
After you select what do you want to use, click on '''"Configure"''' for one of the GameCube controllers. | |||
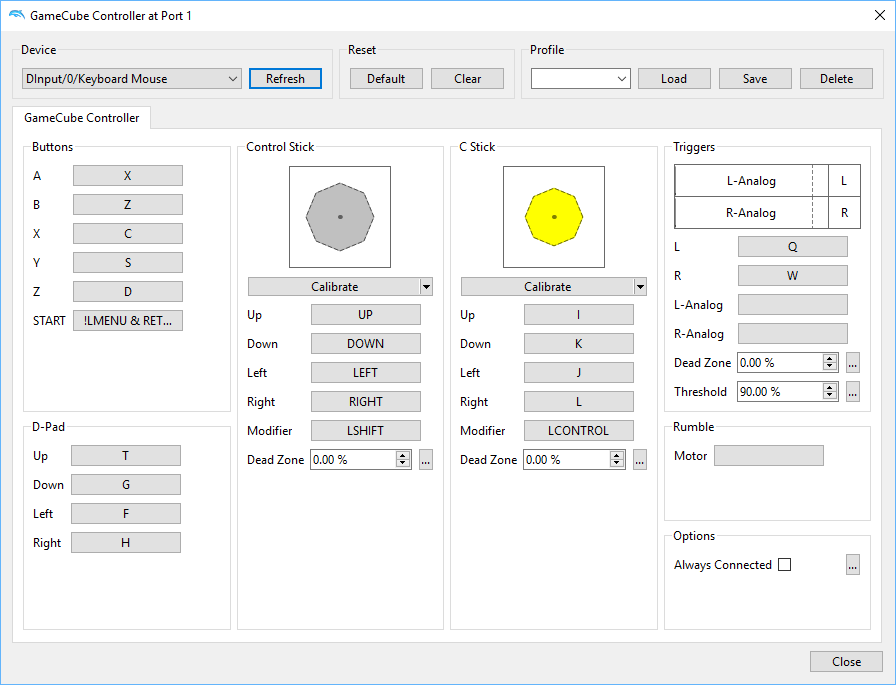
[[File:Dolphin-GCPad-config-window.png|link=]]<div style="clear: left;"></div> | [[File:Dolphin-GCPad-config-window.png|link=]]<div style="clear: left;"></div> | ||
Choose any device that is connected to your PC in the '''Device''' dropdown, and set the buttons and axes to your liking. | Choose any device that is connected to your PC in the '''Device''' dropdown, and set the buttons and axes to your liking. | ||
| Line 16: | Line 19: | ||
*Middle click a slot to clear it of inputs. | *Middle click a slot to clear it of inputs. | ||
*Right click a slot to show more input options. | *Right click a slot to show more input options. | ||
| Line 23: | Line 25: | ||
'''Background input''' lets you use the controller even if Dolphin isn't in focus. | '''Background input''' lets you use the controller even if Dolphin isn't in focus. | ||
'''"Radius"''' limits the radius of the joystick input. Since the GameCube controller does not use 100% of its radius, | '''"Radius"''' limits the radius of the joystick input. Since the GameCube controller does not use 100% of its radius, a radius of 70-75 is appropriate for most controllers. Those using an unofficial GameCube adapter should set the radius to 100. | ||
'''"Profile"''' allows you to save/load input configs. | '''"Profile"''' allows you to save/load input configs. | ||
After setting up everything that you want, click '''"OK"''' and the changes will save. | After setting up everything that you want, click '''"OK"''' and the changes will save. | ||
=== Using an Official GameCube Controller Adapter for Wii U === | === Using an Official GameCube Controller Adapter for Wii U === | ||
''See: [[How to use the Official GameCube Controller Adapter for Wii U in Dolphin]]'' | ''See: [[How to use the Official GameCube Controller Adapter for Wii U in Dolphin]]'' | ||
== Wii Remote == | == Wii Remote == | ||
[[File:Dolphin- | [[File:Dolphin-Controller-Config.png|link=]] | ||
Dolphin can use both real and emulated | Wiimote settings are also found in the Controllers panel. Dolphin can use both real and emulated Wii Remotes. | ||
| Line 44: | Line 48: | ||
* To connect a Real Wiimote, press '''Refresh''' then press the "1" and "2" buttons on your Wiimote simultaneously. If '''Continuous Scanning''' is enabled, there is no need to press refresh every time: just press the "1" and "2" buttons simultaneously after the game is running or when the Wiimote window is open. Real Wiimote connectivity will only work if one of the Wiimotes is set to "Real Wiimote" or "Hybrid Wiimote". RVL-CNT-01-TR Wii Remote Pluses do not work with this method, see the [[Wii Remote Plus (RVL-CNT-01-TR) Connection Guide]]. | * To connect a Real Wiimote, press '''Refresh''' then press the "1" and "2" buttons on your Wiimote simultaneously. If '''Continuous Scanning''' is enabled, there is no need to press refresh every time: just press the "1" and "2" buttons simultaneously after the game is running or when the Wiimote window is open. Real Wiimote connectivity will only work if one of the Wiimotes is set to "Real Wiimote" or "Hybrid Wiimote". RVL-CNT-01-TR Wii Remote Pluses do not work with this method, see the [[Wii Remote Plus (RVL-CNT-01-TR) Connection Guide]]. | ||
'''Continuous Scanning''' allows you to connect a Wiimote without having to open the Wiimote window and press refresh every time. As long as a game is running or the Wiimote configuration window is up, just press "1" and "2" on your wiimote simultaneously and it will connect. This option will only work if a Real Wiimote is selected in one of the wiimote slots. | |||
'''Continuous Scanning''' allows you to connect a Wiimote without having to open the Wiimote window and press refresh every time. As long as a game is running or the Wiimote configuration window is up, just press "1" and "2" on your wiimote simultaneously and it will connect. | |||
If a game thinks a Wiimote has been disconnected during play, pressing "Alt-F5" for the first controller may correct it. The second, third, and fourth controllers are mapped to F6, F7, and F8 respectively. | If a game thinks a Wiimote has been disconnected during play, pressing "Alt-F5" for the first controller may correct it. The second, third, and fourth controllers are mapped to F6, F7, and F8 respectively. | ||
| Line 58: | Line 55: | ||
The power button on Wiimote will not affect Dolphin, nor vice versa. | The power button on Wiimote will not affect Dolphin, nor vice versa. | ||
=== Emulated Wiimote === | === Emulated Wiimote === | ||
[[File:Dolphin-emulated-wiimote-config.png|link=]]<div style="clear: left;"></div> | [[File:Dolphin-emulated-wiimote-config.png|link=]]<div style="clear: left;"></div> | ||
Emulated remote works in the same way as the GCpad settings. Choose any device that is connected to your PC in the '''Device''' dropdown, and set the buttons and axes to your liking. | Emulated remote works in the same way as the GCpad settings. Choose any device that is connected to your PC in the '''Device''' dropdown, and set the buttons and axes to your liking. | ||
*Left click a slot to detect input, then press a button or axes on your selected controller to save it to that slot. | *Left click a slot to detect input, then press a button or axes on your selected controller to save it to that slot. | ||
*Middle click a slot to clear it of inputs. | *Middle click a slot to clear it of inputs. | ||
*Right click a slot to show more input options. | *Right click a slot to show more input options. | ||
| Line 75: | Line 75: | ||
'''Upright Wiimote''' alters the base swinging and tilting orientation of the emulated wiimote to the upright position. | '''Upright Wiimote''' alters the base swinging and tilting orientation of the emulated wiimote to the upright position. | ||
'''Speaker Pan''' allows you to shift the emulated wiimote audio to the left or the right on your system speakers, if "Enable Speaker Data" is checked. -127 is left, 0 is centered, and +127 is right. | |||
If you controller supports it, '''"Rumble"''' will allow your controller to experience the Wiimote's rumble functionality. Once in the window, click on the motor pattern you wish to use (sine, cosine, etc), and press "Select" to apply it. If you wish to add a second pattern, with your existing pattern still there, click another pattern and press "|OR". Hit OK to accept the changes and exit the window. | If you controller supports it, '''"Rumble"''' will allow your controller to experience the Wiimote's rumble functionality. Once in the window, click on the motor pattern you wish to use (sine, cosine, etc), and press "Select" to apply it. If you wish to add a second pattern, with your existing pattern still there, click another pattern and press "|OR". Hit OK to accept the changes and exit the window. | ||
| Line 81: | Line 83: | ||
After setting up everything that you want, click '''"OK"''' and the changes will save. | After setting up everything that you want, click '''"OK"''' and the changes will save. | ||
=== General Settings === | |||
These settings apply to both emulated and real wiimotes. | |||
'''Sensor Bar Position''', '''IR Sensitivity''', '''Speaker Volume''', and '''Wiimote Motor''' are duplicates of Wii settings. They do exactly what they say they do, and work exactly like the same settings on the Wii itself. | |||
If '''Enable Speaker Data''' controls whether the wiimote speaker can produce sound. When using a Real Wiimote, the audio will come out of the wii remotes' speakers; with emulated wiimotes, it will come out of the system speakers. Some games, like [[Metroid Prime 3]], have lag issues when Enable Speaker Data is enabled on some systems. | |||
[[Category:Tutorials]] | [[Category:Tutorials]] | ||
Revision as of 10:16, 2 January 2015
This page explains how to configure controllers in Dolphin, assuming the controller is connected and working with your system. If you need help, or want game-specific configurations, see the forums.
GameCube controller
First, click the "Controllers" button.
In this screen, you can set what is plugged into the various emulated ports. If you wish to use more than one GCpad, make sure you set the correct number in the top under "GameCube Controllers".
After you select what do you want to use, click on "Configure" for one of the GameCube controllers.
Choose any device that is connected to your PC in the Device dropdown, and set the buttons and axes to your liking.
- Left click a slot to detect input, then press a button or axes on your selected controller to save it to that slot.
- Middle click a slot to clear it of inputs.
- Right click a slot to show more input options.
If you controller supports it, "Rumble" will allow your controller to experience the GameCube's rumble functionality. Once in the window, click on the motor pattern you wish to use (sine, cosine, etc), and press "Select" to apply it. If you wish to add a second pattern, with your existing pattern still there, click another pattern and press "|OR". Hit OK to accept the changes and exit the window.
Background input lets you use the controller even if Dolphin isn't in focus.
"Radius" limits the radius of the joystick input. Since the GameCube controller does not use 100% of its radius, a radius of 70-75 is appropriate for most controllers. Those using an unofficial GameCube adapter should set the radius to 100.
"Profile" allows you to save/load input configs.
After setting up everything that you want, click "OK" and the changes will save.
Using an Official GameCube Controller Adapter for Wii U
See: How to use the Official GameCube Controller Adapter for Wii U in Dolphin
Wii Remote
Wiimote settings are also found in the Controllers panel. Dolphin can use both real and emulated Wii Remotes.
Real Wiimote
Select Real Remote in the dropdown for a Wiimote slot. Dolphin supports up to 4 Real Wiimotes at once, along with any peripherals you have attached to them.
- To connect a Real Wiimote, press Refresh then press the "1" and "2" buttons on your Wiimote simultaneously. If Continuous Scanning is enabled, there is no need to press refresh every time: just press the "1" and "2" buttons simultaneously after the game is running or when the Wiimote window is open. Real Wiimote connectivity will only work if one of the Wiimotes is set to "Real Wiimote" or "Hybrid Wiimote". RVL-CNT-01-TR Wii Remote Pluses do not work with this method, see the Wii Remote Plus (RVL-CNT-01-TR) Connection Guide.
Continuous Scanning allows you to connect a Wiimote without having to open the Wiimote window and press refresh every time. As long as a game is running or the Wiimote configuration window is up, just press "1" and "2" on your wiimote simultaneously and it will connect. This option will only work if a Real Wiimote is selected in one of the wiimote slots.
If a game thinks a Wiimote has been disconnected during play, pressing "Alt-F5" for the first controller may correct it. The second, third, and fourth controllers are mapped to F6, F7, and F8 respectively.
Dolphin does not automatically turn off Wii Remotes as the Wii will, remember to turn off controllers on your own to save battery power.
The power button on Wiimote will not affect Dolphin, nor vice versa.
Emulated Wiimote

Emulated remote works in the same way as the GCpad settings. Choose any device that is connected to your PC in the Device dropdown, and set the buttons and axes to your liking.
- Left click a slot to detect input, then press a button or axes on your selected controller to save it to that slot.
- Middle click a slot to clear it of inputs.
- Right click a slot to show more input options.
Extension Allows you to add an emulated nunchuk, guitar, or other wiimote peripheral. Select the extension you want to emulate in the dropdown, and press configure to open a window with slots just like the emulated wiimote window. Select buttons and axes as you wish, and press OK to save.
Background input lets you use the controller even if Dolphin isn't in focus.
Sideways Wiimote changes the emulated wiimote controls to allow you to play games as though the wiimote is sideways, without actually changing your controls. It is useful for games such as New Super Mario Bros. Wii that are designed for it.
Upright Wiimote alters the base swinging and tilting orientation of the emulated wiimote to the upright position.
Speaker Pan allows you to shift the emulated wiimote audio to the left or the right on your system speakers, if "Enable Speaker Data" is checked. -127 is left, 0 is centered, and +127 is right.
If you controller supports it, "Rumble" will allow your controller to experience the Wiimote's rumble functionality. Once in the window, click on the motor pattern you wish to use (sine, cosine, etc), and press "Select" to apply it. If you wish to add a second pattern, with your existing pattern still there, click another pattern and press "|OR". Hit OK to accept the changes and exit the window.
"Profile" allows you to save/load input configs.
After setting up everything that you want, click "OK" and the changes will save.
General Settings
These settings apply to both emulated and real wiimotes.
Sensor Bar Position, IR Sensitivity, Speaker Volume, and Wiimote Motor are duplicates of Wii settings. They do exactly what they say they do, and work exactly like the same settings on the Wii itself.
If Enable Speaker Data controls whether the wiimote speaker can produce sound. When using a Real Wiimote, the audio will come out of the wii remotes' speakers; with emulated wiimotes, it will come out of the system speakers. Some games, like Metroid Prime 3, have lag issues when Enable Speaker Data is enabled on some systems.